Digital photo organization may not be on your radar as part of having an organized home. But just as we keep our clothes in our closet or cleaning supplies in a cupboard, our digital photos need to have a home base where they are stored.

I’m so excited to be linking up with three of my favorite bloggers to bring you all the best ideas to getting your photos off the devices and into an organized place. We also have a few ideas for how to display all those beautiful memories!
I have the pleasure of introducing you to April from Love Our Real Life, Morgan from My Pear Tree Home and Jaclyn from Coffee, Pancakes & Dreams.
Be sure to stop buy and say hello to each of these lovely ladies and check out their ideas for getting your digital photos organized and on display!
If you’re visiting from one of these lovely ladies blogs, welcome! I’m Amanda and here at Miss Sue Living I’m totally into routines and organizing. If you’re looking for ways to streamline everyday living then make sure to visit my Freebie Library for all the printables. I’m so happy you are here visiting – I hope you stay awhile!
And now, on to the real reason you are here – digital photo organization!
Now that summer is coming to an end, our phones and cameras are filled with all the awesome memories of summer. It’s time to get them off our devices and organized!
Organizing digital photos can sound like a huge, daunting task. This may be the reason that has prevented you from tackling this organization process in the past. Where do you even start?
Where To Store Digital Photos?
Your Digital Storage Hub is the place where you will store all your original digital photos.
The best two ways to store original digital photos are:
- Your personal computer
- An external drive
These two places can be your Digital Storage Hub. It’s the place or home for all your original digital photos.
Don’t pay someone else to store YOUR photos. Set up a Digital Photo Hub (DPH) that you have access to 24/7 and that you own. It lives with you – not up in the clouds.
There may be affiliate links in this post. By clicking on them, or purchasing recommended items I may receive a small compensation, at no cost to you. However, I only recommend products that I absolutely love and use in my own home or would love to use. Thank you for supporting Miss Sue Living when you shop! See my disclosure policy for more info.

What Are Some Free Digital Photo Storage Options?
These cloud storage options could be a third back-up option. Using a third party to store your original digital photos does come with risk.
Servers or internet connections go down, companies go out of business or change their policies and hackers can breach cloud providers to steal or destroy information. I would only use these options for temporary storage. It would be devastating to lose years of memories.
Also make sure to read the Terms of Service Policy for each of these cloud storage options. Some make you pay to access your own photos!
Never use cloud storage as your first option. My mom lost 2 years worth of photos by storing them in a cloud photo service. They changed their terms of service and she lost all those pictures because she didn’t identify the email telling her about the changes. 2 years of memories gone!
iCloud
When you set up iCloud, you automatically get 5GB of storage. After that you can buy more storage.
Amazon
Amazon Drive offers unlimited photo storage with a Prime Membership. You can also get 5 GB of video storage with your Prime Membership.
Google Photos allows you to back up unlimited photos and videos for free up to 16MP and 1080p HD. Access them from any phone, tablet, or computer on photos.google.com.

Before You Organize, Gather All Digital Photos Into Your Hub.
I’m guessing you have photos on multiple devices: Phones, tablets, computers, memory cards, CD’s, hard drives, and cameras.
All these photos need to be placed in your new Digital Photo Hub (DPH) before the organization can happen.
This can be a large job to tackle but well worth it! It will make the organization process a lot smoother when you have all your photos in your hub.
How to Organize All Digital Photos On Your Computer
Set Up A Basic File System
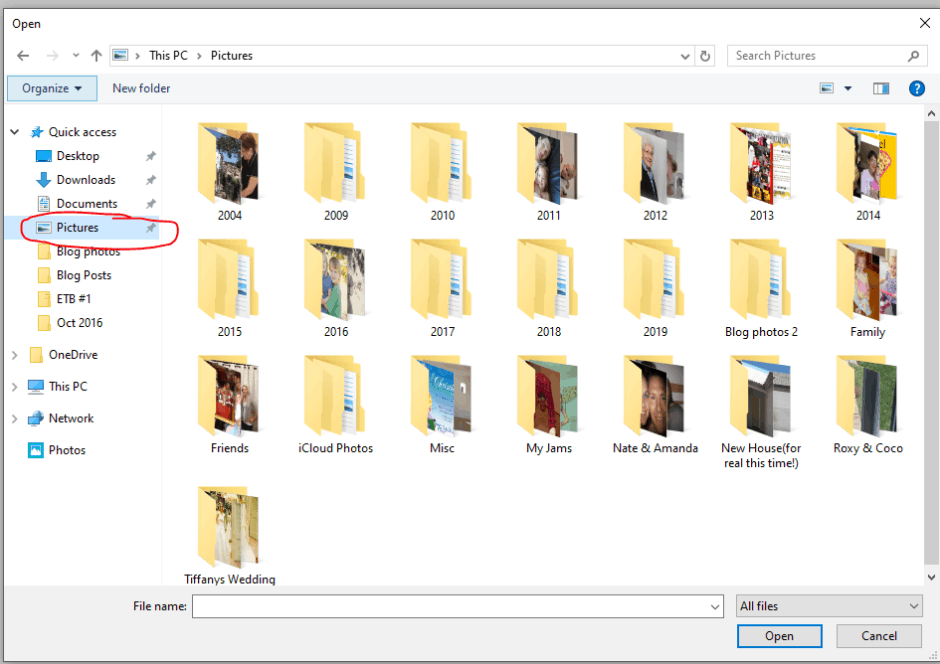
Start with using your computer’s “Pictures” directory. This is the most logical place to make our filing system.

Yearly
Within your Pictures Directory create Yearly folders. Go back as far as you need to (1997,1998, 2000 etc.).

Monthly
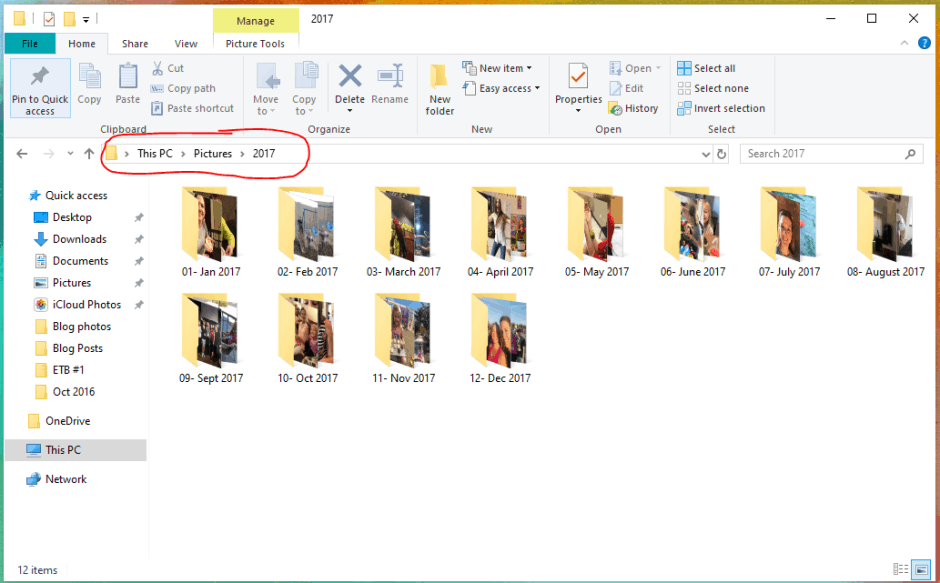
Next, add Monthly folders within the Yearly folder. When you are first getting started, I would stick with these two basic folders: Yearly and Monthly.
Pro Tip: When adding the monthly folders, make sure you include the number of the month first followed by the spelling of the month. For example: 01- January, 02- February. Most computers organize folders in alphabetical order. Adding the months number will keep the folders in order to make them easier for you to locate.
Events or Subjects
Once you have your basic file system in place, you can then take time to go back and break monthly folders down by subjects or events (Ann’s 25th Birthday, Trip to Rome, etc.).
Organizing The Photos
Move Photos into the Correct Folder
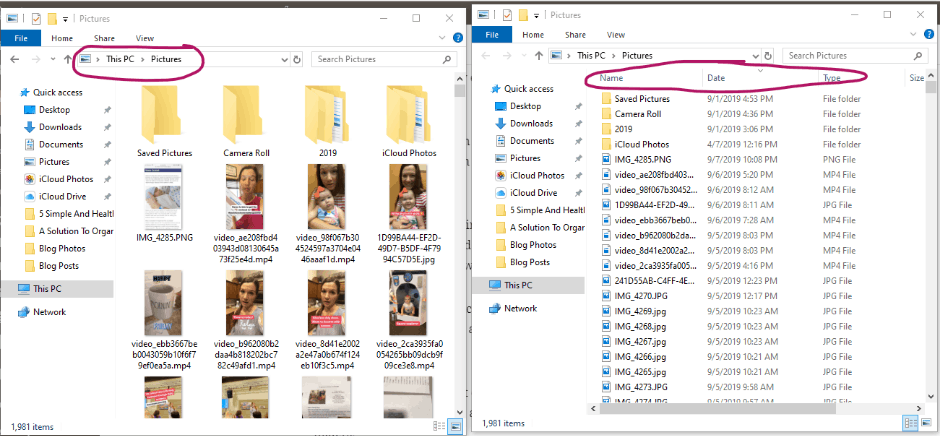
- Go into your Pictures Directory
- Click on the View button.
- Change the view to Detail.
- Lastly, sort pictures by date. You can click on Date to sort in ascending or descending order.
Now your pictures will be in list form and ordered by date. You can see the Name, Date, and Type. From here it will be easier to move pictures to the correct folder.

Next, open two computer windows – each with your Pictures Directory. From here you will drag and drop photos from one window into the correct Yearly folder in the second window.
After you have moved all pictures into the correct Yearly folder, go into each yearly folder and drag and drop photos into the correct Monthly folder.
If you choose to make Event or Subject folders within your Monthly folder, use the same drag and drop action to place photos in corresponding folders.
Stop by Love Our Real Life for additional ideas from April on how to organize digital photos on your computer.
Delete, Delete, Delete
You now have your photos organized into the correct folders. Here is where you will take some time to look for photo quality.
My kids love to take photos using my old iPhone. That means I have lots of pictures of stuffed animals, Barbies and Hot Wheels in my picture folders.
While having a couple photos of toys may be fun to look at, in the future I don’t need to hang onto every picture my kids have ever taken.
Pictures of their tongue and squashed noses are pretty silly. I’ll be ok deleting those. 😉
Take time to delete duplicates. We all take many photos each day. Not all of them are worthy of keeping.
Jaclyn from Coffee, Pancakes & Dreams shares a creative way to display your favorite photos in this post – go take a peak!
Back It Up
Your computer is your main DPH but you still need to take precautions and back up your digital photos.
The best way to backup your photos is with an external drive.
Choosing An External Drive
I have an advantage in this area as my husband’s profession is in IT (Information Technology). He is knowledgeable in the latest computer software and device information.
With his expert knowledge, we can recommend a great external drive.
Quality
When choosing an external drive you want to take into account the brand quality. Make sure to read user reviews and stick with the major brands. Generally speaking you get what you pay for. You want it to be durable and able to withstand a drop from your hand or desk to the floor.
Speed is also an important factor to consider. You want it to do the job as quickly as possible and not take days to back up all your photos. You will pay a premium for external drives that are SSD (Solid State Drives) but they are much faster than hard disk drives (HDD). If you do not care about speed, you will get more storage for your dollar with external HDDs.
Paying for good quality is ok! You are storing your legacy on this device so don’t skimp on a cheap external drive that may fail quickly down the road. Be sure to note what kind of warranty comes with the external drive.
Capacity
How much data can this external drive hold? My husband recommends the following process: Think about past and future photos you may be adding to this external drive. Give yourself plenty of space to store your photos. Think about what you may need now and in the future and then double that number to find a good starting capacity point for your drive.
Accessibility
Get an external drive that can be easily stored in a secure location like a safe or fire cabinet. Choose the correct type for your computer. Do you use a PC or Mac? Is the external drive compatible with one or the other or both?
You now have a knowledge base in choosing the correct external drive for your needs. Let’s take a look at two possible options that could meet your digital photo needs.
Option #1
This is an affordable option that is reliable. It’s compatible with Windows and Mac computers and comes with a 1 year warranty.
Option #2
If you care about speed as mentioned above, this would be a good choice. It’s small fast and can be password protected. A 3 year warranty is included. Compatible with Windows 7, Mac OS X 10.9 (Mavericks), Android 4.4 (KitKat), or higher
Start Now And Keep Going
This whole process can seem overwhelming. Don’t feel intimidated!
I recommend starting now. Start with the current year.
Just getting started is progress. You can set up your Digital Photo Hub now and have your pictures organized going forward.
Starting with the current year and getting those photos organized will propel you to want to get old photos organized.
It’s so fun to be able to find the pictures you are looking for with ease!
Hop over and check out how Morgan from My Pear Tree Home got her photos off her phone and easily displayed for all to enjoy.
Once A Month Maintenance
Make sure you keep organizing digital photos going forward. You have taken time to create a home base for your photos so make sure to keep using it.
I recommend setting a monthly appointment for adding photos to your Digital Photo Hub (DPH). A great day to add photos to your DPH is the first weekend of the month.
It’s an easy date to remember and can become part of your routine. At the beginning of the month you add last month’s photos to your DPH.
Digital Photo Organization Process
Lets review the steps you need to take to get your digital photos organized:
- Create your Digital Photo Hub on your computer.
- Setup a basic filing system.
- Organize your photos within the file system.
- Delete photos.
- Backup your DPH using an external drive.
- Keep using your DPH going forward.
You can do this! Digital photo organization will take some effort at first, but once you have your system in place it will take minimal effort to keep it up going forward. Enjoy your memories now that they are organized and be sure to share them with friends and family!


